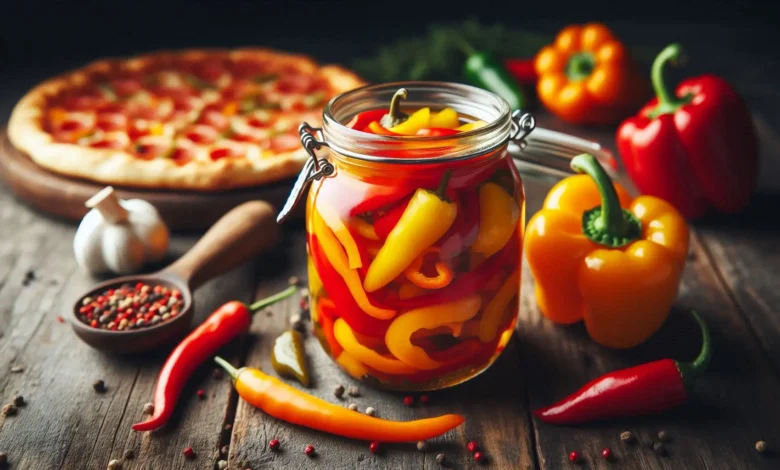
Pickled Sweet Peppers Recipe: Easy & Flavorful
Sweet, colorful, and irresistibly tangy—these Pickled Sweet Peppers will brighten up any dish.
Introduction
Pickled Sweet Peppers are a delightful addition to your culinary repertoire. With their vibrant colors and sweet, tangy flavor, these peppers make a great topping for sandwiches, salads, or even a flavorful snack. Whether you’re new to pickling or a seasoned pro, this recipe will guide you through the process of creating these crunchy, tangy treats that last for months when stored properly. Let’s dive into this simple yet delicious recipe to make your own homemade Pickled Sweet Peppers!
Ingredients
| Ingredient | Quantity | Notes |
|---|---|---|
| 🫑 Sweet Peppers (e.g., bell or banana) | 6 cups | Use fresh, firm peppers for best results. |
| 🧴 Vinegar | 2 cups | White vinegar or apple cider vinegar works well. |
| 💧 Water | 1 cup | Helps balance the acidity of the vinegar. |
| 🧂 Salt | 2 tablespoons | Adds flavor and helps preserve the peppers. |
| 🍬 Sugar | 2 tablespoons | Adds sweetness to balance the acidity. |
| 🧄 Garlic Cloves | 4 cloves | Lightly crushed for extra flavor. |
| 🌰 Mustard Seeds | 1 teaspoon | Optional, adds a subtle spice. |
| 🌶️ Peppercorns | 1 teaspoon | Optional, for extra kick. |
| 🍃 Bay Leaves | 2 leaves | Adds aromatic flavor. |
Equipment Needed
- 🍴 Large Pot
- 🍶 Measuring Cups and Spoons
- 🧼 Clean Jars (Mason jars or similar)
- 🧑🍳 Tongs or Jar Lifter
- 🧴 Funnel (for easy pouring into jars)
- 🔥 Stove or Heat Source
- 🧻 Paper Towels (for wiping jar rims)
- ⏲️ Timer (for tracking cooking times)
Step-by-Step Instructions
- Prepare the Peppers:
- Wash and slice the sweet peppers into rings or strips, depending on your preference.
- Make the Brine:
- In a large pot, combine vinegar, water, sugar, salt, mustard seeds, and garlic. Bring to a boil, stirring occasionally to dissolve the sugar and salt.
- Sterilize Jars:
- While the brine is heating, sterilize the jars and lids by boiling them in hot water for 10 minutes. Remove and let them dry.
- Pack the Jars:
- Pack the sliced peppers tightly into the sterilized jars. You can also add extra garlic, mustard seeds, or fresh herbs for added flavor.
- Pour the Brine:
- Once the brine reaches a boil, carefully pour it into the prepared jars over the peppers, leaving about 1/2 inch of space at the top.
- Seal the Jars:
- Wipe the rims of the jars with a clean paper towel to remove any residue. Place the lids on the jars and screw on the rings tightly.
- Process the Jars:
- Process the jars in a boiling water bath for 10 minutes to ensure they are sealed properly.
- Cool and Store:
- Remove the jars from the water bath and let them cool completely on a towel. Once cooled, check the seals and store the jars in a cool, dark place for at least 2 weeks before opening.
Tips & Storage Tips
- Allow the Flavors to Develop:
- For the best flavor, let the pickled peppers sit for at least 2 weeks before opening. This allows the brine to fully infuse the peppers.
- Storage:
- Once opened, store the jars in the refrigerator. The pickled peppers should last up to 6 months when refrigerated.
- Adjusting the Heat:
- If you prefer a spicier kick, leave some seeds from the peppers in the jar. Alternatively, for a milder flavor, remove all seeds before pickling.
- For Crunchy Pickles:
- To maintain the peppers’ crunch, consider adding a grape leaf or an unpeeled clove of garlic to the jar. This helps to keep the pickles crisp. (for more Pickling Recipes)
Variations & Substitutions
- Sweet and Sour Pickled Peppers:
- Add a bit more sugar to the brine if you prefer a sweeter pickle. You can balance it with a bit more vinegar for an extra tangy taste.
- Herbed Pickled Peppers:
- Experiment with herbs like thyme, oregano, or basil in the brine for an aromatic twist.
- Pickled Hot Peppers:
- For a spicier version, you can substitute sweet peppers with hot peppers like jalapeños or banana peppers. This will increase the heat while maintaining the same pickling process.
- Sugar-Free Option:
- If you’re looking to make a sugar-free version, simply replace the sugar with a sugar substitute, such as stevia, but keep in mind that the texture and flavor may slightly change.
Conclusion & Call-to-Action
Pickled Sweet Peppers are a delightful addition to your pickling repertoire, offering vibrant colors and a sweet, tangy flavor that can elevate any meal. Whether you’re using them as a topping for sandwiches, a side for charcuterie boards, or simply snacking straight from the jar, these peppers are sure to impress your taste buds and guests alike.
Why not try making your own batch today? The process is simple, and the results are rewarding. Share your creations with friends and family, or gift a jar of these sweet peppers as a thoughtful homemade treat.
Ready to explore more pickling recipes? Don’t forget to check out our collection of flavorful preserves and subscribe to our updates for fresh ideas delivered straight to your inbox!